Monday, November 2, 2015

Workshops YAY!

I have a few exciting teaching announcements and a ton of planning, prepping, stitching, retreating, drawing, and scheming ahead of me.
 I will make this post picture heavy and hopefully brief.
I have been invited to teach at some very exciting shows in 2016 and I couldn't be more excited!

QUILTCON FEB 2016
To start the year I will be at Quiltcon in Pasadena teaching, all hands on classes. I had an amazing time in Austin and am really looking forward to February.

MQX APRIL 2016
In April I will be teaching at MQX in New Hampshire. New England will be gorgeous in April and I am looking forward to returning as a teacher instead of a student. I am teaching two hands on classes as well as some lecture/demo classes. To sign up for my classes click here.

MQS MAY 2016
In May I will be off to Cedar Rapids, Iowa to teach at MQS, registration is not open yet, but should be in the upcoming weeks!

SMQG 2015
But hey! 2015 isn't over yet and I am thrilled to be hosted by the Seattle Modern Quilt Guild
for a drawing/ modern whole cloth design workshop. Join me Sunday, November 15th, 2015 from 10:30-4:45 at Tukwila Sew and Vac
 Click here to register, there are 5 spots left and registration is open to the general public now.

WORKSHOPS!! YAY!


Shown below are a few examples of what my Compositional Drawing/Whole cloth design class will look like. I am teaching this class at Quiltcon, MQX and at Tukwila sew and vac with SMQG.


The photos below are samples that I have been making for my Broken Wreath and Ghost Shapes lecture/demo classes at MQX and MQS.


 Here, I used contrasting blue thread, definitely out of my comfort zone but it's a great exercise and the designs can really pop out.


Shown below is quilting on one of the samples that I marked out in my whole cloth design class, this technique quilts out pretty fast and has been a very liberating way for me to look at quilting.


And Voila!

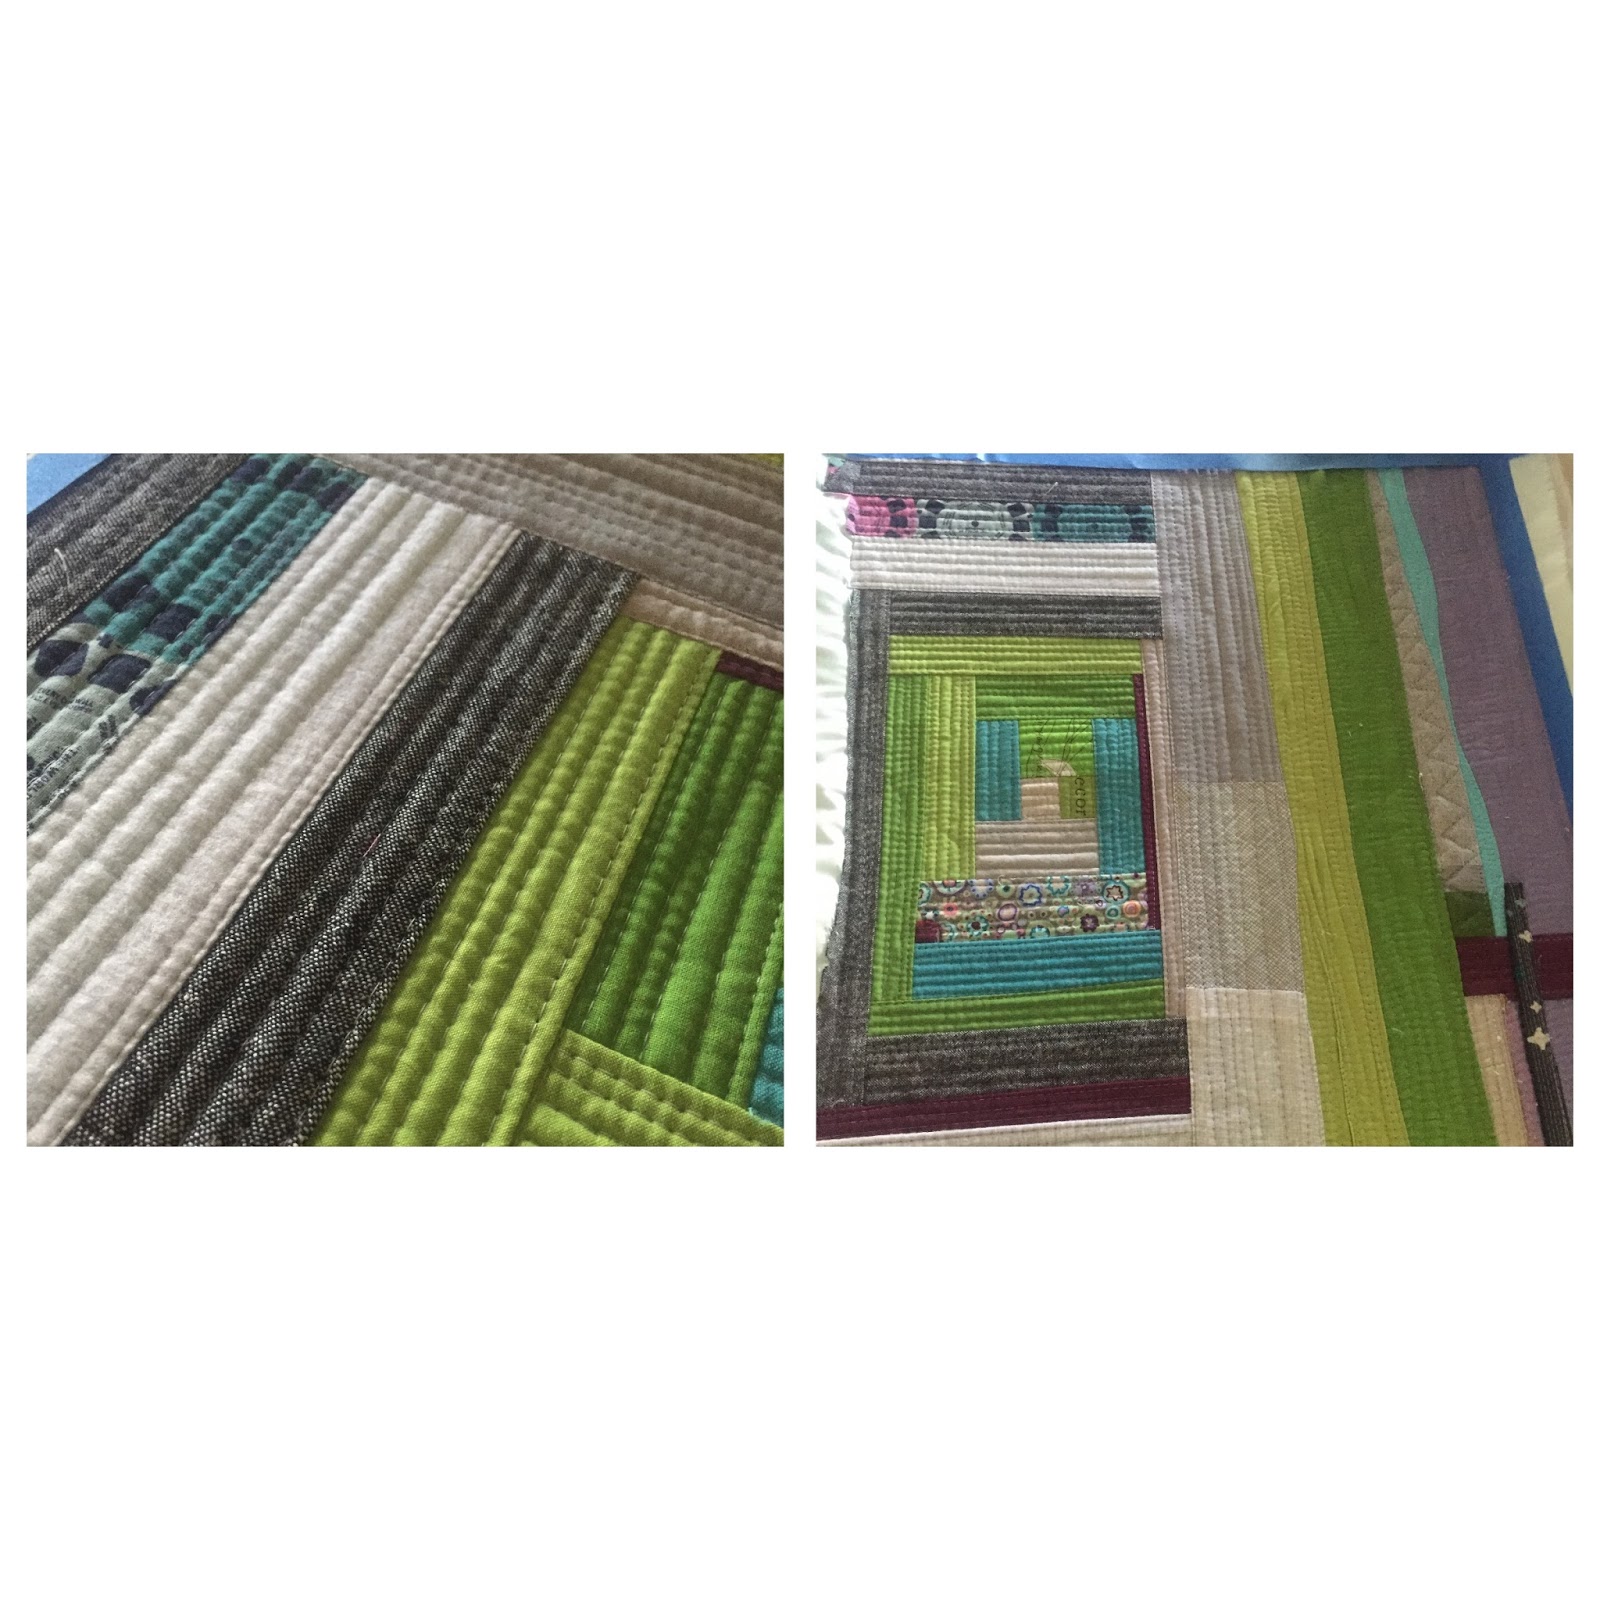
I've said it before but making class samples always opens up new doors for me. This style of quilting has inspired me to start working on a whole cloth (type) design, that's really not a whole cloth at all. Here are a few photos of my latest project which I will go into more detail as I figure out what I'm actually doing.
The design is inspired by the stitch and flip triangle which is sprinkled through a lot of
Katie Pedersen's work. I took her magic numbers class and was amazed at the possibilities that exist within this format. I am approaching this project with the intentions of doing it entirely on the longarm so there will actually be no stitch and flip anything, all of the piecing will be raw edge appliqué but the design is certainly inspired by Katie's work, which you can find in her and Jacquie's fabulous book, Quilting Modern.


Off to get my week going, thanks for taking the time to read and I look forward to meeting some of you in my classes in the months to follow!!
xo

Monday, September 14, 2015

Voices

As the transition from Summer to Fall gets completely underway in our household I look forward to new adventures both with my kids growing up and new work ventures. With my kids back at school I have more time to be in the studio working on plans for teaching. Every time I start a class sample I find a few new classes lurking within the process. Staying focused is the big challenge for me but I really love the possibilities that exist within this exploration. I started working on a sample for my upcoming  QuiltCon class, Piece as you Quilt. In this class students will learn how to use their longarm for the very popular QAYG (Quilt as you go) method of piecing and quilting simultaneously. This is a great technique for creating quilted panels which can be used for a million different projects. I have made tote bags, throw pillows, placemats and pot holders...the list goes on and the possibilities are endless.


 Pictured below are a few boxy totes made from QAYG panels that were quilted on a domestic machine but I have found the Longarm to be a much quicker way to get these panels made.


The technique I use is log cabin based and has a very improvisational feel. Below is the first panel that I experimented with.


 I have been finding ways to incorporate gentle curves, as well as the "illusion" of curves with the quilting, this process is very relaxing. Be warned, if you experiment with this you may never want to do anything else on your longarm again.
After feeling like I was gaining proficiency I decided to try my hand at a larger project...dare I say a quilt....pieced entirely on the longarm. Definitely easier said than done and I'm pretty sure I learned more about what one should NOT do than what you should do. Regardless,  I have come to really love this process, and I hope I am able to organize it enough to comfortably teach it in the future. For me it has been very freeing and a complete escape from many of the quilting rules(both real and imagined) that I have tried to abide by over the last ten years. 
Technically, the quilt I have created is somewhat of a disaster....so eloquently displayed on the solid white fabric I brilliantly chose for the back. There is a lot of raw edge piecing and very messy quilting throughout. I have to admit, if you are a perfectionist this may not be the technique for you, but if you are willing to take a leap of faith you may want to join me once I figure out how to teach this.
I began with a 45" square piece of white solid fabric for the back, yep, there it is big mistake number one. Note to self, if quilting may be questionable use a busy back, or at the least don't use SOLID WHITE.
  I floated a similar sized piece of batting and began in the middle. I started with only white fabric because in my mind I was going to create a piece as you quilt, white.....um... whole cloth. 
 I'll probably revisit that idea later as the possibilities are intriguing but perhaps I'll call it something other than the term used to describe the complete opposite of what it is. 


So far so good, all piece as you go on the longarm. Unfortunately though, as the quilt grew, my throat space did not. While the horizontal seams were still manageable the long vertical ones were not. 
Uh Oh. This was not going as planned and although there may be tutorials out there that make this work I am not one to consult the internet for help. 
(unless, of course it involves diagnosing a fictitious and uncommon disease that either myself, one of my friends, pets, children, loved ones or all of the above must obviously have).

I took it off the frame and decided to hang it on the design wall to see if I could work myself out of this dead end. Hmmm. Look at all of those lovely half square triangles I had floating around on my design wall. 

Why can't I use those? 
 Yes, as it turns out I talk to myself, and through the years all of this talking to myself has led me to believe a lot of things about quilting that may or may not be true or even real. 
Like, raw edge is bad.
 Quilting lines can not cross. 
Points need to match. 
Seams need to match.
Straight lines should be straight. 
Iron to the left, iron to the right, iron seams open.
Don't iron.
Quarter inch seams are correct. 
Hammers should not be used in quilting. 
As you can see being in my head is exhausting and I am done with these rules.
 So, shut up Krista and do what you want and above all else stay OFF the Internet and so I did.

 Since I began working from the center out, it only made sense to continue in this direction and embrace the medallion style of quilting that it seemed to be gravitating toward.
Shut up the voices, reload onto the longarm and start breaking some rules.

Hey! 
That wasn't there before, but it is now and I worked the quilting in to match the quilting behind it, the back is a mess, but I don't really care.

Continuing in this haphazard manner I have almost completed a 45" square quilt. It is not pieced entirely on the longarm, as those half square triangles were pieced and then raw edge appliquéd onto the quilt, but for all intensive purposes it is "mostly" pieced on the longarm. But really, who's keeping track?


Technically, it's a quilt judges nightmare and as you can see, quite messy up close but it has a very collage-like sensibility and regardless of what those voices said, I love it.


I took it off the frame once more to look at it from a distance and get a little bit more perspective on the design, this was my final layout, but who knows what it will end up like. I have it loaded on the longarm again and hope to have it completed in the next few weeks.


Happy to be back to blogging and finding my way in the quilting world. I am looking forward to teaching at QuiltCon in Pasadena, CA in February 2016 and at MQX in Manchester, NH in April 2016.
Thanks for reading! Have a wonderful week.


Monday, April 13, 2015

Chotskies


I consider myself to be a pretty tidy person, unless you're including the pile of clothes on the floor in front of my closet. Which doesn't really count, because I don't want to talk about that, much less blog about it. So, back to me being tidy, I realized it had probably been over ten years since I "really"cleaned out my studio.
 CHOTSKI? 
What is a Chotski and why on earth do I have SO MANY of said items??
Defined in the Urban Dictionary as:
Generally useless crap of little or no value. UH OH.
So it began, a good two weeks of literally taking down everything off of my walls, out of my drawers, shelves and under surfaces. I have a full garage full of bags of priced garage sale Chotski and a bag full of E-bay Chotskies. 


Bag of Ebay Chotskies
I have a great studio space, it is 300 square feet and I have no reason to complain....BUT with a 
12' long-arm table I have to admit the space is tight and the way it was previously set up was very dysfunctional. The first thing I did once I got all of the useless crap off the walls was add two new design walls. There are many great design wall tutorials on the web, I used Katies tutorial found here.

Insulation board


Below you'll see the two spots ready for design walls


I also moved the collapsible cutting table from its previous location and replaced it with my sewing table seen below in its new location. The sewing table has a removeable back piece that I hope to be able to add if and when I am able to move my Gammill back a few feet and/or get a 
10' instead of 12' table.


Clean!

This area still needs some work, that tiered shelf was a very stupid purchase on my part and a terrible waste of space. Shelves to match my thread storage are on someones honey do list. That will open up a lot more storage for....fabric, of which I obviously need more of.
The cutting table opens quite easily and I can store the cutting mats on the back of my long-arm when I need to close the table.


OK so there's still Chotskie sitting around but a lot less.


Still some creepy dolls. 


And as always, I am beach rich.


I love my new design walls the most, and this is a great cutting station, I had previously been using this table as an ironing table in the corner where my new cutting table has a gone.


From the view below you can see my thread wall and the top shelves where I store extra batting and rolled quilts. My WIP's are in the white cardboard Ikea storage bins and below is a hanging rod where I previously stored customer quilts. I hope to push the Gammill back into that space and open up the area for my domestic sewing machine a bit, we'll see. The fabric you see in this picture is my entire stash, for me less is more, I get overwhelmed by too much. Weird I know.


On my design wall is the Bride of Frankenquilt, meet Frank here and here. He needs a bride and I hope that what you see here will become just that.


Here are my thread shelves with a bit of room for more fabric.


Not bad for two weeks worth? I still haven't had the garage sale but everything is priced and I still haven't listed everything on Ebay, but soon. If you are interested in checking out my studio before the changes you can look at my Studio Spotlight post here. Honestly, it's not a whole lot different just a LOT LESS CHOTSKIE and new design walls.

Happy week everyone!!

Thursday, April 9, 2015

Make it Take it Blog Tour (with giveaway!)


Happy Thursday! 
Welcome to my stop on the Make it Take it blog hop for  Krista Hennebury's fabulous retreat book.


I collaborated with Krista on a small table runner that could be made in a weekend, we decided to build the top from simple pieced designs that could be mimicked as ghost shapes in the quilting. Krista made the top and I did the quilting.  I quilted a ghost flock of geese and added some circles and straight lines to pull it all together and keep it flat. This was a really fun project, one that could easily be completed on a retreat.


I had the pleasure of working on two projects for this book, the other was the quilting on Krista's beautiful Orange Grove Quilt, which is a modern take on the classic Pine Tree block.
Here is a WIP shot of the quilting. With the blocks all being set on point I had a great expanse of space to add some fun quilting designs. Krista's only request was that I add a moon, which you can see getting fleshed out in the photos below.


I quilted this quilt with a lot of straight lines, I stayed consistent in the tree blocks with straight line fans. I varied the quilting design in all of the alternate white blocks by adding swirls and bubbles to break up the space and add interest.

Below are some detail shots of the alternate white blocks. 


 While the quilting may be a bit more than one person would complete on a retreat the pine tree blocks would be a fun retreat block exchange. There are some amazing projects in this book, including Krista's fabulous thread catcher.  She gifted me one years ago (at the first retreat of hers that I attended) and I use that thing every. single. day. 
See below, thread catcher happily perched next to machine and notice the double scissor keeper hanging on my wall, also in the book, designed by the very talented Amy Friend. This book is a treasure trove of beautiful and useful projects and I am so happy to be among the contributors, most of whom I am lucky enough to call friends.


If you haven't ordered a copy yet I highly recommend you do
OR you can comment here to win an e-copy of the book, I will choose a winner on Sunday!

Winner has been chosen! Thank you for all of the comments!!!


Don't forget to stop by all of the other amazing contributors blogs to get a sneak peak of their projects from the book and have a great end of the week! It's almost Friday!!!

Blog Tour Schedule 

Friday, April 3 Blog hop kick-off: Krista at Poppyprintcreates
Monday, April 6: Berene at Happy Sew Lucky and Amy at During Quiet Time
Tuesday, April 7: Leanne at She Can Quilt and Felicity at Felicity Quilts
Wednesday, April 8: Martingale Inc. at Stitch this! (check out their Rainbow Round the Cabin staff party!)
Thursday, April 9: Krista at Spotted Stones and Krista at Krista Withers Quilting
Friday, April 10: Lynne at Lilys Quilts and Cindy at Live a Colorful Life
Saturday, April 11: Ayumi at Pink Penguin and Krista at Poppyprint
Sunday, April 12: Kristie at OCD: Obsessive Crafting Disorder and Christina at Sometimes Crafter